Funding methods and vendor payment methods
What it does
Two things have to be in place before money can move: an account of yours for the money to come from (a funding method), and a way for the vendor to receive it (their payment method).
How to use it
Add a funding method
- Click Settings in the sidebar, then the Funding methods tab.
- On Funding payment methods, click Add funding method.
- Fill in a Display name — something you'll recognise on the pay screen, like Operating account.
- Pick the Funding method type, such as ACH bank account.
- Tick Make this the default funding payment method if you want it offered first at pay time.
- Click Add funding method.
It appears in the list with the last few digits shown, like Operating ••0011, and is offered when you pay bills. Add as many as you need and pick between them at pay time — see Paying bills.
BotDoPay always keeps one active funding method marked Default. If none of yours is marked, it picks your longest-standing active one for you — there's nothing to click.
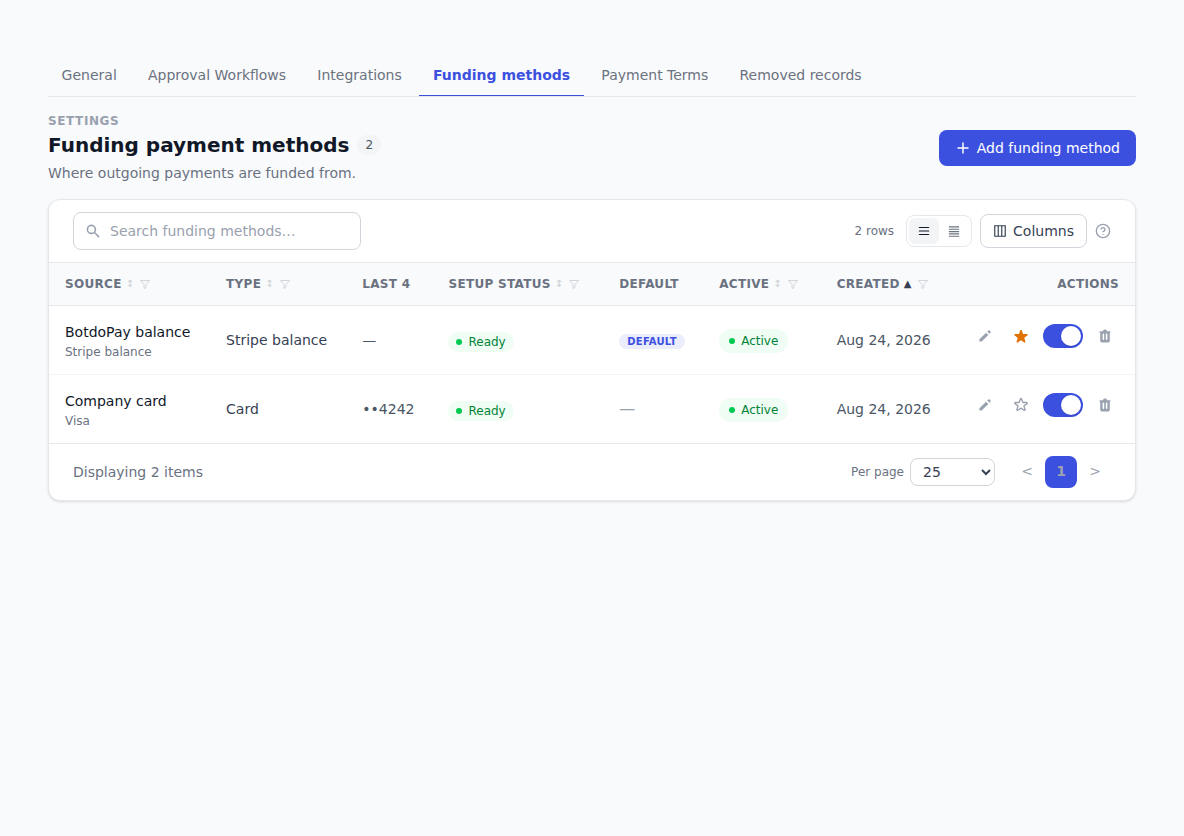
Read the list
Each row shows the name, the type and the last few digits, plus three things worth watching:
- Setup status — Ready to use, Pending verification while your bank is being confirmed, or Needs setup if you started it but didn't finish.
- Default — the one method offered first at pay time.
- Active — Active or Inactive. Only active methods are offered at pay time.
A method sitting at Pending verification is waiting on small test deposits or a confirmation from your bank — allow 2–3 business days. How you finish it depends on the type:
-
A check account is finished here. Click the pencil on the row. You'll be asked for either the two deposit amounts — First deposit (cents) and Second deposit (cents), in whole cents — or a Statement code from your bank statement; which one you get depends on your bank. Fill it in and click Verify deposits (or Verify). A check account can't fund anything until this is done.
If the deposits never arrived, open Didn't get the deposits? Resend. Have your bank details to hand — they're never stored, so you'll re-enter them — and the 2–3 day wait starts again.
-
Any other bank account is finished from the email you were sent when you added it. It comes from Stripe rather than BotDoPay, so search your inbox for Stripe if you can't find it. There's nothing to complete here, and the method turns Ready on its own once your bank confirms.
Manage a funding method
The controls at the end of each row are icons. Hover over one to see what it does.
- Pencil opens Manage funding payment method, where you rename it, add the card or bank details if it still says Needs setup, finish verifying a check account showing Pending verification, or replace the card or bank account behind it.
- Star makes that method your default. The row that already is the default shows a filled star instead of a button, and an inactive row shows no star at all — activate it first.
- Switch turns the method Active or Inactive. Turning one off keeps the record and its history but stops it being offered at pay time. Switching off the one marked Default hands that badge to another active method, if you have one.
- Trash removes it.
Add a payment method for a vendor
- Open the vendor from Vendors.
- Find the Payment methods panel.
- Fill in a Name and pick a Type, such as Bank account.
- Click Add.
To pay a vendor by posted check instead, click Add check payments (mailed check) on the same panel. Checks go to the vendor's remit-to address, so add one on the vendor's form first — the panel tells you if it's missing.
Set up how a vendor gets paid
Adding the payment method above only names it. Before money can reach the vendor, their payout details have to be filled in.
First check the top of the Payment methods panel. If it reads Onboarding is currently unavailable, the form below won't submit however carefully you fill it in — see Troubleshooting before you start.
- On the vendor's Payment methods panel, click the pencil beside the method. It reads Onboard in-app the first time, and Update onboarding info once you've made a start.
- You'll get the Onboard payment method page, with the vendor's name at the top and a checklist beside the form tracking what's still missing.
- Work through Business details, Representative, Payout bank and Authorization, choosing Company or Individual as it applies to them. Choosing Individual adds an Individual section for their own details.
- Fields marked with a star (
*) are the ones the form won't submit without. - Click Submit onboarding.
Once it's done the vendor's payment method reads enabled, and their bills can be selected on the pay screen. Click the refresh icon on the row to re-check the status at any time.
You fill this in on the vendor's behalf, so you'll need their details to hand — there's no link to send them.
How BotDoPay picks a destination
Each vendor has a default payment method. When you pay, BotDoPay routes to that. If it can't be used, it picks another one the vendor has set up and tells you on the confirm screen — Default unavailable — routing to …. You can override the choice per vendor with the change control on the confirm screen.
Troubleshooting & Help
- "Onboarding is currently unavailable." Filling in a vendor's payout details on their behalf is switched off across BotDoPay while a platform agreement is confirmed. It isn't a setting anyone at your company can change. Existing payment methods carry on working and you can still read through the form, but it won't submit — contact BotDoPay support for timing.
- A bill can't be ticked and says "Not onboarded." That vendor's payout details aren't finished. Click Not onboarded to go to their page and complete the steps above — unless the panel says onboarding is currently unavailable, in which case see the note above.
- A payment method says it was set up for Stripe-hosted onboarding. That older route is gone. Remove that payment method and add a new one, then onboard it in-app.
- "Full SSN (9 digits)." On the individual path the whole nine-digit number is needed. Type all nine digits.
- You can't see the Funding methods tab. Only some accounts can set up funding. Ask an admin at your company.
- A funding method isn't offered at pay time. Check it reads Ready and Active on the Funding methods tab, and that its type suits the bills you're paying — check payments, for example, need a check account.
- A check account says it never finished registering with the check provider. It can't be repaired in place. Remove it and add it again.
- "Cannot remove a funding payment method that's backing a payment." It's part of a payment's history, so it can't be deleted. Switch it to Inactive instead and it stops being offered.